Sensible Stylista

The Striped Tank: 4 Ways

Alright guys, today's post is a goodie for me because it's all about remixing!  I've decided to do more of these from here on out because honestly, there's nothing more sensible than re-styling pieces.  As I'm sure y'all can tell by the title, I'm all about my Chaser tank today on SS.  I've already shared these looks with you guys on here, but I wanted to create a recap just in case!  Plus, it's fun to compare looks side by side.  
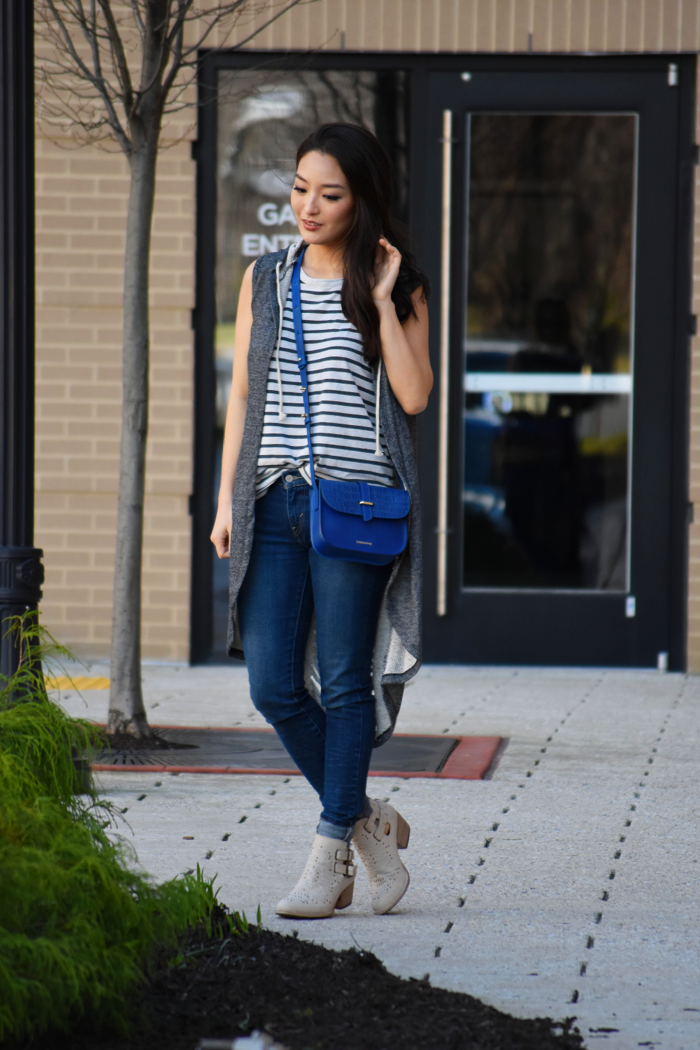
1.  This was definitely a Spring fave of mine!  I partnered up with Black Petunia to style their distressed sleeveless vest for this post.  I ended up pairing it with my striped tank because it complemented the piece beautifully.  I threw on tomboyish ankle boots to further reinforce my casual vibe and carried a stylish crossbody bag to top off my look.  To see deets from this post, clicky here to access the full blast.

2.  I pretty much lived in this ensemble when I visited NYC a while back - click here to read about Big Apple shenanigans.  I don't know if you guys remember, but I went up there to give a social media workshop for the Fashion Potential.  To read more, click on the aforementioned link!  Anywho, this look is yet another fave of mine because it's pretty BAMF for me.  Wearing this outfit definitely helped me channel my inner badass.  I paired the tank with high-waisted shorts to showcase the small of my waist, creating the illusion of longer legs; anddddd speaking of illusions, if you want to look 10 pounds lighter with fashion, click here.  I threw on a sleeveless vest for warmth and accessorized with my favorite body chain to add edge.  Click here to see more!

3.  I was aiming for casual sophistication here!  I paired my tank with skinny jeans and threw on a fitted blazer on top for polish.  I elevated my potentially blah look with stylish cap-toed heels and fierce statement jewelry.  To read more about my look, click here to access the original post.

 4.  By far the most formal of the four, this outfit was featured quite recently on SS!  I centered my post around my new utility skirt - it was a steal at $20  - from Banana Republic.  I've always been a huge fan of the military trend - I even have a pinterest board dedicated to it here - so purchasing this was a no-brainer.  I typically accessorize with lots of jewelry, but I skipped it for this look because I wanted to keep things clean and simple.  I carried my YSL snakeskin crossbody instead though - IMHO the chain's bold enough to act as a faux-necklace!  To see more shots from this post, click here.

I hope you guys enjoyed this post!  Which ensemble do you guys like best - 1, 2, 3 or 4?  Make sure y'all let me know by leaving me a comment below.

Brooklyn Hat Company

You guys have no idea how excited I am for summer!  I, for one, am pumped to whip out my massive collection of sunhats.  Cute lids are everything - not only do they help you practice safe sun, they elevate your style tenfold. Anywho, for today's post, I'll be telling you guys all about my current favorite hat brand.  

Founded in a small studio in Williamsburg, NY, Brooklyn Hat Company invigorates the social graces of the new and old, delivering diverse styles that blend the past with the future by incorporating fine fabrics in a wide selection of colors and textures.  Unique designs and trims, diversified silhouettes and shapes, high-end materials are some of the many great features for which this brand focuses.  

Beauty Review: Gillette's Venus Silk-Expert

This post was sponsored by Gillette Venus as part of an Influencer Activation for Influence Central.  I received complimentary products to facilitate my review.  
I'm super excited to tell you guys all about Gillette's new Venus Silk-expert.  For those of you looking to try a different hair removal experience, this tool is a convenient and comfortable solution.  It features cutting edge tech that's easy to handle.  I'm all about at-home spa experiences so this device is a total must-have for me!  The Venus Silk-expert marks a milestone in IPL (intense pulsed light) systems because it has a unique SensoAdapt skin tone sensor that adjusts automatically - it delivers the right amount of light, eliminating the complicated manual color charts that other devices require.  

Y'all have no idea how excited I am to blog about this.  I first heard about IPL a year or so ago - my friend was getting married and she booked several sessions with a pro to prep herself for her honeymoon.  I remember her raving about how well it worked for her!  I wanted to try it out for myself, but I never got around to doing so because it was so freakin' expensive (think thousands of $$$).  Now, thanks to Venus, I can do it myself for a flat fee.  The full treatment cycle takes 12 weeks so I don't have final results to share yet, but I'm going to tell you guys about my experience thus far.  
First things first, it comes with one IPL device (as you can see, it's fancy looking and fits perfectly in my hand), a two-part power cord, a razor and a user manual.  I read the instructions thoroughly from front to back - if you're looking to try this baby out yourself, take the time to do so as well.  Note: this item works best on mid-to-light skin tones + darker shades of hair! If you have dark skin and light hair, this may not work as well - just giving you a heads up.

Anywho, it's important to realize that this product doesn't remove hair - its purpose is to break the cycle of hair growth so hair will become weaker, finer, lighter, and grow slower.  You start out by using this device consistently (once a week for 12 weeks), but after that, you only really have to do it once a month, maybe even less down the road.  FYI, you still have to shave in between to get stray hairs - that's why they included the razor!  
To start, I tried it on my legs.  The device delivers 120,000 pulses, and there are two power levels: normal and gentle.  It operates in target mode & gliding mode - the latter's best for large areas like your legs.  The treatment requires you to shave the area before use so I used the provided razor + gentle soap to prep.  Do not slather on lotions or the like because the area needs to be free of oils pre-treatment.  

Using the Venus Silk-expert is easy-peasy.  Simply plug the adapter into the wall, then plug in your tool. The device will light up with a blue UV light!  Remember to always keep full contact with the treated area, and be careful not to expose your eyes to the laser.  Like I mentioned previously, I used the "glide" function on my legs, and the "target" function on my ankles and knees!  If all goes well, I'll be using this baby on my underarms and bikini line.  Oh, and if you were wondering, I used the gentle setting just to be safe.  I was worried that it'd hurt, but the whole experience was totally painless.  I don't see a huge difference yet, but I've only been at it for the last 4 weeks or so.  I trust that this device will deliver, and I'm looking forward to shaving (much) less in the future.

Please let me know if you guys have any questions or concerns.  I'm here for y'all 24/7! Seriously. Don't be afraid to reach out!  The Venus Silk-expert is available online at huge retailers like Amazon and Bed Bath & Beyond, and pricing starts at $399 - clicky here to try it out for yourself.  Also, there's going to be a #VenusSilkExpert twitter party on June 3rd from 12-1 PM EST hosted by @Momcentral & @GilleteVenus so make sure you guys save the date!